Tuesday, November 1, 2011

Activity Feeds now available in Dynamics CRM 2011

Microsoft recently released Activity Feeds in its November update of Dynamics CRM Online 2011. These would however automatically be available to only those CRM organizations that one would subscribe to from this point on. For all existing organizations you need to download it from the pinpoint site http://dynamics.pinpoint.microsoft.com/en-IN/applications/microsoft-dynamics-crm-activity-feeds-12884926310

We installed this solution on CRM Online organization but I believe this can also be imported to an On-Premise organization.


It is quick to install and you can get it up and running in a matter of few minutes.


After you import the solution, you would find the following changes to your sitemap
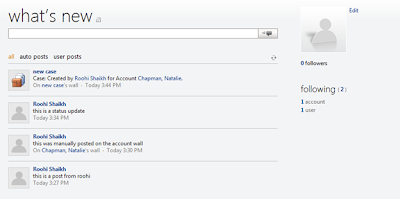
A new option “What’s New” added to the Workplace.


Configuration options in Settings --> System


Lets first configure the entities to start receiving feeds from them.
You need to create a new Post configuration record through the Activity Feeds Configuration option. You need to create one record each for each entity that you want to setup for Activity Feeds.

In the entity name you need to enter the CRM entity logical name. So instead of Case, you would enter incident.


After you click on Save, you will find the Rules auto-created for this entity. I understand that these rules are predefined and there is no option to create a new rule. Also these rules are only available for certain entities. When I create a record for account entity, no rules were created for them.


For this configuration to take effect, you need to click on the All Customizations ribbon button. This will publish the entity customization for the set entity.


In our case, when we click on the All Customizations, it will modify the Case entity form to add the Record Wall.


If you have multiple forms designed for an entity, the publish fails.


You need to then manually add the tab for Record Wall. Instructions for these are provided here http://help.crm.dynamics.com/help/5.0.9688.1531/1033/LIVE/content/source_af_add_record_walls.htm
Once an entity is set up for activity feeds, you can then open any record for that particular entity and click on Follow to start receiving updates for that record.


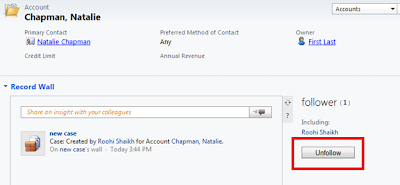
Any updates to the record wall of the records that you choose to follow would be displayed to you on your Personal Wall.


With the auto-feed rules automatically created for the case entity, each time a new case is created or any of the actions on the case is performed that is being tracked by the activities feed, an update would automatically be posted for the Case on the its wall and would also be reflected on the wall of the users that follow that record.

You can also follow the feeds of another user. For this you need to open the User record and then click the follow button on the user record wall to start receiving updates posted by that user.


You are now set to collaborate in CRM on different CRM entities including custom entities!


To make the wall available on Custom entity you need to create a record in the Post configuration for the custom entity. In the entity name type the schema name of the custom entity and check the Enable walls checkbox.


Make sure you publish this custom entity after creating the configuration record.

Monday, October 31, 2011

Team Ownership now available in CRM 2011

In CRM, an entity could be designed to be User Owned or Organization owned. The User Owned ownership setting has now been changed in CRM 2011 to be User or Team Owned. This means that you can now assign a record to either a Team or an individual owner.

Let us now explore the behavior of records owned by a Team.

Using the Assign option you can now assign to a user or a Team.


Earlier you could only select a user.


In CRM 2011, you can define Teams and also assign Roles to the team. With each team, a Queue specific to the team is also created alongside.

The security role permission level has also been modified to accommodate the concept of Team. The user level permission now also extends to the team. This means that a user with user level permission can now work on records owned by themselves as well those that is owned by the team to which they belong.


The one that gives higher/maximum permission is applied to the user. Say a user does not have permission to invoice module. But the team to which they belong have the permission to Create/Read/Write user level invoice records, an Invoice assigned to the Team would be visible to the user.

All users of a team would have access to the record assigned to the Team.

With the concept of Team they have tried to reduce the need to Share the records. Earlier if you needed to provide another user access to a record owned by you, you had to share the record with them. Now if they are part of your team they have access to your records.

To explain technically, a new attribute Owning Team has now been added to each User/Team Owned entity. The OwningTeam will store the name of the Team if it has been assigned to a Team.


You can now programmatically assign Team to a record using the Assign Request. You can check here for the code. http://msdn.microsoft.com/en-us/library/gg327897.aspx

Tuesday, October 18, 2011

Enable Scripts on Bulk Edit form in CRM 2011

CRM 2011 includes the feature to enable script on the bulk edit form. By default the scripts are disabled for bulk edit forms.

To enable the script for Bulk edit forms check the below syntax

<event
active=["0" "1" "true" "false"]
application=["0" "1" "true" "false"]
attribute="String"
BehaviorInBulkEditForm="String"
eventType=["DataEvent" "ControlEvent"]
name="String">
<dependencies />
<Handlers />
<InternalHandlers />
</event>

See below detailed descriptions for the attributes.


Steps to enable the script on bulk edit form:
- Include the entity for which you would like to enable the bulk edit script and export the solution.
- Open the customization.xml
- Add BehaviorInBulkEditForm="Enabled" to the event handlers as shown below


<event name="onload" application="false" active="false" BehaviorInBulkEditForm="Enabled" >
<event name="onsave" application="false" active="false" BehaviorInBulkEditForm="Enabled" >

- Save and Import the solution, publish it.
- Now your script will work on bulk edit form.

This way you can let your users use bulk edit freely with your custom script also executing just fine. Earlier, usually if there was custom business logic to be performed plugins were advised as it would allow the custom business logic to be executed for all records that were edited through Bulk Edit.

Friday, October 14, 2011

Different operators used with workflow

There are six different operators used in e workflow.

1. Set to: This operator is used to set value of the field of any data type.


2. Append with: This operator can only be used with text field. It will append specified field's value or the default value to the existing value. This operator has introduced in CRM 5.


3. Clear: This operator can be used with all data types. This will clear the field's value.


4. Increment by: This operator can only be used with decimal fields. This will increment the existing value with the specified field's value or default value.
5. Decrement by: This operator can only be used with decimal fields. This will decrement the existing value with the specified field's value or default value.
6. Multiply by: This operator can only be used with decimal fields. This will multiply the existing value with the specified field's value or default value.


Bulk or Mass edit is the great feature in CRM that allows us to edit multiple records at a time. But it will only allows us to set the value, we cannot perform above operations in bulk edit. With the help of workflows, we can perform above operations on multiple records.

Monday, October 10, 2011

Working with CRM 2011 Solutions

With Dynamics CRM 2011, Microsoft goes one step further in simplifying the process of moving the customizations from one system to another. In the CRM 2011 you can now simply export and import the customizations in the form of solutions. There are two type of solution in the CRM 2011.

1. Default Solution: This is the customizations of your entire CRM 2011 Organization.

2. Managed Solution: Managed solution is a packed and user can install it on their machine. The benefit of the Managed solution is that, it can be uninstalled if you do not wish to use any of its components any more. The deleting/uninstalling does not impact any other customization in the system. Unlike CRM 4.0 if you want to remove something, then you need to remove the fields from the Form, delete from the entity and remove the buttons from the ISV config. But in the CRM 2011, if you have imported the managed solution then you need to simply delete this solution, it will automatically remove all the components included in the solution like, Forms Customizations, Fields and Buttons.

It is advisable to package products as managed solutions.

3. Un-Managed Solution: We generally use the unmanaged solution during the development process. An un-managed solution cannot be deleted like the Managed solution. Changes made by importing the unmanaged solution are permanent and is included as a part of the existing entity customizations. If we have imported the Solution on any system as Un Managed, and if we need to remove the that, then we need to remove the each item manually from CRM.

Export the Solution:

1. Export the Default Solution: If you want to take a backup of your entire organization customization you can export the Default customization. To export the default solution, please open the CRM.

Go to the Settings --> Customizations, as shown in the below screenshot.


Now click on “Customize the System”, it will open the following window.


As shown in the above screenshot, you need to click on the “Export Solution” button, to export all the customizations from the CRM.

We generally export these customizations when we need to move all the customizations from one system to another. If you have any managed solution already imported in your organization. Exporting the default solution will not let you import this customization set on a new organization unless you import that managed solution on the new organization as well. The managed solution is not inherently included when the default solution is exported.

2. Export the Managed Solution: To export the solution as Managed, you need to create a solution. And add the required component in this solution.

To create the new solution, open the CRM and go to the Settings --> Solutions as show in the below screenshot.


Now click on the new button to create the New Solution. And you can add the required component in this solution. Suppose if we want to export the account entity customizations, then the solution will be as follows.


As shown in the above screenshot, we have created a solution in which we have added the Account entity. now you need to click on the Export Solution button to export the account entity customization.

In the Export Solution wizard, on the 4th Screen you need to select the option to export the customization as managed. As show in the below screenshot.


When you export the solution as a managed solution, it only exports that part of the entity customization that was not included in the default entity design. This means to say that only custom attributes or custom form layouts will be exported for the entity when the solution is exported as Managed solution.

When you import the managed solution it will merge these customizations with the existing entity design on the system where it is being imported. This allows for the original entity customizations not being lost or overridden with Import and export of customizations as was the case with CRM 4.0.

3. Export the Un-Managed Solution: To export the Solution as Un-Managed, you need to select the “Unmanaged” option, as shown in the below screen.


When you export the solution as Unmanaged, it exports the entire entity customization and when it is imported on another organization, existing entity customization on that organization would be overridden

Import the Solution:

To import the Managed/Unmanaged solution, please open the CRM, and Go to the Settings --> Solutions and click on the Import button. It will display the following window.


Now you need to Browse the .zip or .cab solution file to import the CRM 2011 Managed or Un-Managed customizations.

Delete or Un-Installing the Solution: To uninstall the Managed solution you need to delete the solution from the CRM. If you uninstall the Managed solution then all components which is installed by you managed solution will be deleted. Say for example you added 2 custom fields in the account entity as a part of a managed solution. If you delete/uninstall this solution from that system, then these two fields will automatically be deleted without impacting any other part of the entity customization.

To delete the solution, open the CRM and go to Settings --> Solutions and select the solution and click on the delete button. As shown in the below screenshot.


Issues faced with managing the solutions:
• Suppose if you install the Managed solution on the any CRM and this solution contains the some html web resources. And these are then manually added to the SiteMap and entity ribbons etc. Deleting this managed solution will give the dependency error. You cannot delete this solution because the components of this solution are used elsewhere in the project and not as a part of the managed solution. As shown in the below screenshots, we are trying to delete the below Managed Solution.


It will give the following error.


After clicking on the Details link, it will clearly shows the dependencies. As shown below.


• Also if you want to Transfer the plug-in steps from one machine to another machine through the Solution, you need to make sure that the plug-in assembly is set to be registered on the database. If it is set to Disk importing this solution on another system would result in error as this assembly would not be present on the target system