Friday, February 27, 2009

List of Events available to trap in Scripts when saving a Dynamics CRM Form

CRM 3.0 has limited event detection made available using scripting. However It is now possible to detect which user action was performed to Save the form using the event.Mode property in the OnSave event.

You can gain more detailed information about the user actions in the OnSave event by referencing the event.Mode values. These values represent the buttons clicked by the user to save the record.

The following event modes are supported:

EntityEvent ModeValue
AllSave1
AllSave and Close2
AllSave and New59
Task, Phone Call, Letter, Fax, AppointmentSave as Completed58
AllDeactivate5
AllReactivate6
Alluser-owned entities Assign 47
E-MailSend7
LeadQualify 16
LeadDisqualify15

By checking the value of event.mode we can find out which button user has clicked and based on this take further action.

To cancel the Save operation event simply use the script below:
event.returnValue = false;

Wednesday, February 25, 2009

Add SRS report to CRM Form

In course of implementation of Dynamics CRM, a number of clients have asked us to display reports designed using Sql Reporting Services (SRS) within CRM as a tab or may be as a option to the Main Menu. This helps the user to quickly check reporting. I have described a simple way to achieve this in Dynamics CRM
This can be done using following steps.
- Create SRS report.
- Get the rdl file from the project.
- Open IE and type
http://servername/reports without port number as shown below


- Click on “Upload File” each time for each of the “.rdl” files which we are sending you with this mail and then click OK.
- Do not change its “Name” attribute, as shown below.


- Open IE and type
http://servername/reportserver without port number
- Here you will find the report with the same name as of above.
- Click on the page which will open the report in IE.


- Copy this url and use where ever you want i.e. in IFrame or aspx page which would look like:

"http://servername/reportserver?%2fcrmorg1_MSCRM%TestReport&rs:Command=Render"
- Just pass this url and you can see the reports.

You can also append "&rc:Toolbar=false" to the above url if you dont want the toolbar to be seen in the reports(refer the above image below the address bar) and "&rs:ClearSession=true" to ensure that everytime you can see fresh reports.So that the modified url will look like:

"http://servername/reportserver?%2fcrmorg1_MSCRM%TestReport&rs:Command=Render&rc:Toolbar=false&rs:ClearSession=true">

With this you can now design a dashboard report in CRM and have it added as item under Workplace and set it as the Default item to be displayed. So each time you login you see the dashboard.

Tuesday, February 24, 2009

Bulk Edit records of any entity in CRM

We can easily edit a record in crm. But what if we need to edit a field of all records with same value. So here, Instead of opening records one by one and editing it, we can also use Bulk edit feature which edits that field in one go for all records.

For some records like account,contact ,lead, Product etc, there is already an in-built feature for bulk editing these records.

Below we have explained how to bulk edit the account records :


  1. Select all the records for which you need to edit fields in bulk. We have selected all the account records as shown in the screen below:


2. Now go to More actions and click on edit.


3. Then you will get the window as shown in the screen below. Here, you can edit any field which will be applied to all the selected records. We have edited the account name.


4. Only when you save this form, you will find that all the selected records have been edited with that value. Here we edited account name and all the account names of selected records will be test as shown in the screen below :


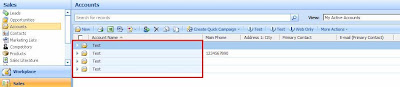
This is how Bulk edit of account entity works.

Note :- CRM does not support bulk edit for all entities like Activities ,SalesOrder.

But, if you want to Bulk edit records of Activities ,salesorder which are not supported by CRM then we can do this also.

For this, you will have to write a JavaScript on “ISV Button” and place that button on the particular entity where bulk edit feature is desired.

In that script we have to call a function which is :

“doAction('crmGrid', 'entitytypecode', 'bulkedit')”

Below is a code for adding a button for bulk editing Appointment records which will be added in the isv.config :

//Start of Script

<Entity name="activitypointer">//You can change the entity name

<Grid>

<MenuBar>

<Buttons>

<Button Icon="/_imgs/ico_18_debug.gif" JavaScript="doAction('crmGrid', '4201', 'bulkedit');" Client="Web">

//”4201” is the entity type code of Appointment

<Titles>

<Title LCID="1033" Text="Bulk Edit" />

</Titles>

<ToolTips>

<ToolTip LCID="1033" Text="Bulk Edit." />

</ToolTips>

</Button>

</Buttons>

</MenuBar>

</Grid>

</Entity>

//End of Script


We have to only change the entitytypecode according to the entities required for bulk edit.

For example : If we want to bulk edit “Salesorder” then we have to write doAction function as follows:

“doAction('crmGrid', '1088', 'bulkedit')” where "1088" is the entitytypecode of salesorder entity.
We can also bulk edit the records for entities like phonecall,email etc by changing their respective entitytype codes in the doAction function.

Friday, February 20, 2009

Automatically resize the IFRAME to adjust to the Form size

If you need to show an external page within CRM, you need to provide the URL to the IFRAME in CRM. You will notice that it would not display scrollbars to scroll through the entire web page being displayed in the IFRAME. So it is advised that we create a custom page and add an IFRAME within a "DIV" tag. This helps in bringing up the Scroll bars to allow users to navigate through the entire page.

But there is still a glitch. If you happen to resize the form on which the IFRAME has been added, you will find that the IFRAME does not automatically resize itself according to the form.

Here is the script that we used to achieve this.

Here we try to resize the two IFRAMES ('IFRAME_ActivityShow' and 'IFRAME_ReportShow') that were added on the CRM form.

Add the below function in the custom page on which the IFRAME has been originally placed


function calcHeightWidth()

{

var main_height = null;

var main_width = null;

var height = null;

var width = null;


// for all except Explorer

if (self.innerHeight) {

main_height = self.innerHeight;

main_width = self.innerWidth;

// Explorer 6 Strict Mode

} else if (document.documentElement

&& document.documentElement.clientHeight) {

main_width = document.documentElement.clientWidth;

main_height = document.documentElement.clientHeight;

// other Explorers

} else if (document.body) {

main_height = document.body.clientHeight;

main_width = document.body.clientWidth;

}


height = main_height * (3/4) + 'px';

width = main_width * (1/2) + 'px';


//change the height of the iframe

document.getElementById('IFRAME_ActivityShow').style.height=height;

document.getElementById('IFRAME_ActivityShow').style.width=width;

document.getElementById('IFRAME_ReportShow').style.height=height;

document.getElementById('IFRAME_ReportShow').style.width=width;

}


We need to attach this function to the IFRAME in the page load event of the custom page.

if (!Page.IsPostBack)
{
IFRAME_ActivityShow.Attributes.Add("onload","javascript:calcHeightWidth()");

}

Hope this helps others too!

Wednesday, February 18, 2009

Design a workflow for performing repetitive tasks

Sometimes, there is a need to perform a particular task or action repetitively over a period of time. We were in a need to create a task activity after every 2 days against an account.

This can be done by creating child workflow and call it from the parent workflow. The child workflow would peform the actual job and the parent will call this child recurrsively.

Here are the steps to get this done:
  1. Create a workflow for required entity (For eg: account) with following triggers
    - On demand
    - As a child workflow
    - Record is created
  2. Set the scope of the Workflow as appropriate (For eg: organization)
  3. Now the structure of workflow will be as follows:

First is wait condition which says, wait for 2 days after the execution of this workflow. This condition is as shown below:

After this condition is fulfilled, a task is created and then again child workflow is started which is the same workflow created above (i.e. test recurring). So, the workflow runs recursively and creates a task after every 2 days.